Showing posts with label dinner. Show all posts

Sunday, June 26, 2016

Baked Stuffed Shrimp

Recently I have been trying to be super good about my eating habits.  My weekday lunches have been poached chicken and salad.  The dressing is just oil and vinegar, diluted with a bit of water, and shaken until emulsified.  Yup, my kitchen is exciting folks!

Weekday breakfasts are equally inspiring.  In a mason jar I combine milk, quick oats, a touch of honey, and some fruit.  Shake to combine and then let sit in the fridge overnight.  My cold oatmeal is less about being in on the latest healthy breakfast trend and more about being the fastest breakfast prep on the planet - unscrew top and insert spoon.

Dinnertime roles around and I let myself off the hook a bit.  I am not an anti-starch person.  Potatoes and I get along rather well and I do not intend for the two of us to ever break up.  However, there are times when I feel food abuses my love of starch.

The prime example is the baked stuffed shrimp.  I see it on restaurant menus or it comes as a dinner option of the wedding rsvp card and I initially think, oooo shrimp!  Then I think, oooo gross stuffing.  Baked stuffed shrimp gets put down in front of you and it's dripping butter in all the wrong ways, the shrimp is rubbery, and the whole thing falls far short of the mark.  Thankfully, I usually remember all of this before I order it.

I found myself thinking about baked stuffed shrimp a few weeks ago.  With the farmer's market in full swing and the weather finally heating up, my mind began to drift to thoughts of water and its contents - seafood! I had bravely attempted swordfish and all of its smelliness.  Now I wanted something I bit easier.  Nothing is simpler to cook than shrimp.  Of course, I realized I wasn't in the mood for simple.

Baked stuffed shrimp isn't simple.  It requires prep work and more ingredients than just a pan, some butter, and a few shrimp.  But, I decided it was time to find a better stuffed shrimp recipe.  Sadly, even Pinterest failed me until I stumbled across a recipe for stuffed squid.

This recipe called for stuffing the tentacles with spinach, tomatoes, and feta.  It sounded wonderful and the perfect substitute for the normal stuffing on shrimp.  I wanted to give mine a bit more Mediterranean flair, so I added kalamata olives.  The result was a baked stuffed shrimp fit for summer!

Mediterranean Style Baked Stuffed Shrimp

Ingredients:

2 lbs. Jumbo shrimp
2/3 lbs. spinach - raw
1 tomato - diced
1/4 c. kalamata olives - sliced
2 oz. feta cheese crumbles
1 egg - lightly beaten

Directions:

Preheat oven to 375F.

Steam spinach in the microwave for about one minute.  Transfer to a heated skillet with a bit of oil and cook for an additional 3 - 5 minutes.  Remove pan from hot burner and let sit as you prep the shrimp and the rest of the stuffing.


Shrimp need to peeled, leaving the tail and that first attached segment.  Carefully butterfly the shrimp, giving yourself a platform to hold the stuffing.  


Once the spinach has cooled down, drain excess liquid.  Place it in a bowl and add the diced tomatoes, sliced kalamata olives, and feta crumbles.  Mix together and then add the beaten egg.  Mix again.  The egg is simply acting as a binder for all of your ingredients.


Place about a tablespoon of stuffing onto each shrimp.  Bake for 20 minutes.


I loved everything about this recipe.  It was nice and fresh with really great flavors.  The olives and feta gave the dish a nice tangy bite.  Most importantly, nothing overpowered the shrimp.  This is a perfect light recipe for summer!

Sunday, June 12, 2016

Carrot Top Pesto

Yup, you read that right...carrot top pesto.  I've never really been a fan of pesto.  Growing up, pasta sauces came in either red or white, never green.  Plus, I really like a thick sauce that you can drown your penne in.  That's not really an option with pesto, so I never jumped on the pesto bandwagon.

This recipe hasn't made me do a 180 where pesto is concerned.  However, I do like adding to my arsenal of recipes and I don't like to be wasteful.  Now I can buy carrots with greens attached at the farmer's market and they might just find their way into the food processor instead of the trash bin.

The farmer's market is actually where I heard about this recipe.  I was eavesdropping on the woman in line in front of me.  I didn't have much choice, there is not much personal space at a crowded produce table and I was waiting to pay for my arugula. I don't remember if the carrot purchaser asked if there was something she could do with carrot greens or if the info was randomly volunteered, but I walked away with the need to investigate further.

I found more recipes than I would have thought were out there, but they all followed a pretty basic set of ingredients.  They all contained some sort of nut, either basil or parsley, and olive oil.  What really got me interested was the variety of nut choices.  I always though of pesto as strictly calling for pine nuts, but with the carrot greens pesto some people people suggested not only pine nuts, but also almonds, macadamias, or even cashews.  I settled on a recipe with cashews because I have a thing for them. It's the nut I always save for last when eating mixed nuts.

Carrot Top Pesto

Ingredients:

1 c. carrot leaves
1/2 c. fresh parsley leaves
1/4 c. unsalted roasted cashews
1 clove garlic
1/2 c. olive oil
1/4 c. Parmesan cheese
salt to taste

Directions:

Pick the leaves from the larger stems of the carrot greens, until you have 1 cup.  Press down the leaves a pit in the measuring cup as you add them, you want a full cup of leaves.


Once you have the leaves from the carrots and the leaves from the parsley, add them to a food processor with the cashews and garlic.


Grind ingredients together with about 7 to 10 pulses or until coarsely ground.  


Turn the processor on and slowly add the olive oil.  Add the Parmesan cheese and pulse until incorporated.  Salt to taste.


Now I will freely admit to not having the world's best processor, so my version is probably a bit coarser than what other people might get in the end.  Regardless of how it turns out, it makes a great addition to your favorite pasta.


Sunday, May 8, 2016

Manicotti with Meat Sauce

Growing up, this recipe was like a unicorn.  It only came out a few times a year and required the use of a cast iron pan we NEVER saw until it was manicotti time.  Let me repeat that for you...this recipe requires it own pan!  How cool is that, it's a recipe that requires its own special equipment. Hmm, I'm not sensing the level of awe, wonder, and reverence that one should have when faced with a manicotti recipe of this caliber.  But that's okay, my enthusiasm is enough for all of us.

I can still remember sitting in the kitchen, watching my mother make the crepes.  Not in a creepy way, in an awe filled way.  Crepes have always seemed like they have this really intense creation process.  And it does.  It requires both precision and swiftness.  I'm still working on my technique.  Thankfully manicotti also involves sauce, so all of the not quite great looking crepes are hidden.

When I finally received the coveted family recipe (and MY very own special crepe pan), I was surprised to find out that crepes do not require a lot in the way of ingredients or batter-making effort.  Eggs, water, flour, salt and mix - that is it.  Very anti-climactic.  The creation process, however, is stressful.  You need a spoon that is just the right size to pour just the right amount of batter in the pan.  You need to swoop the pan at just the right time in just the right angle to get all of the batter all over the pan.  You need to leave the crepe for just the right amount of time before flipping. Oh my word, just thinking about it raises my blood pressure.

Or, I really could be exaggerating.  I am exaggerating.  But, you really do need to be quick.  More so because the crepes are meant to be this, which means they set after only a couple of seconds.  You are not trying to brown the crepes, they are not tortillas.  You want something that is firm but soft and pliable.  Does that sound weird when describing a food substance?  Whatever, it's accurate.  And tasty. Don't forget tasty.

The nice things is, once you master the technique and are comfortable making the crepes, you can use that recipe in so many other ways.  Oh how the jars of Nutella and bananas and strawberries dance in my head.  For now, though, it's time to make the manicotti.

Manicotti with Meat Sauce

Ingredients

Crepes:

6 eggs - beaten
1 1/2 c. water
1 1/2 c. flour
1 tsp. salt

Sauce:

1 onion - chopped
2 garlic cloves - minced
1 1/2 pounds Italian sausage - casings removed
28 oz. crushed tomatoes in puree
6 oz. tomato paste
2 Tbsp parsley - chopped
1/2 c. basil leaves - chopped

Cheese filling:

2 lbs. Ricotta cheese
1/2 lb. mozzarella - shredded
4 oz creamy goat cheese
2 eggs
1 Tbsp parsley - chopped
1/4 c. grated Parmesan cheese
1/2 tsp. salt

Directions

I recommend making everything in the same order as I listed the ingredients, i.e., make the crepes, then make the sauce, then make the filling.  You want the crepes to cool down before the assembly begins.

Begin with the crepes and in a large bowl combine the flour and salt.  In another bowl, beat the eggs with the water then add to the dry ingredients.  Beat together then let stand for 5 minutes.

While the mixture stands, preheat your 6 1/2 inch cast iron skillet greased with olive oil.  When ready, pour a scant amount of the crepe mixture into the pan and allow it to cover the entire surface.  Once the mixture is set, flip.


Cook for a few more seconds then move to a plate to cool.  Repeat.  This mixture should make approximately 40 crepes.


While the crepes are cooling, move on to the sauce.  Also, at this point, turn on the oven and set to 350F.

Heat some olive oil in a large skillet over medium heat.  Add the onions and cook until tender, approximately 7 minutes.  Add the garlic and give a couple of stirs.  Add the sausage and cook for about 10 minutes, breaking up the links as they cook.


Once the sausage is no longer pink add the crushed tomatoes, tomato paste, parsley, and basil.  Reduce heat to simmer and cook for another 20 minutes.

Isn't great how everything looks so unappetizing while you are making it?
While the sauce simmer, move on to the filling.  Mix together the ricotta, mozzarella, goat cheese, eggs, parsley, Parmesan, and salt.  I realize making the filling was extra difficult but have no fear, we're almost done.

Making the manicotti

Line up all of your main necessities - 9x13 casserole dish, sauce, cheese, crepes.  Coat the bottom of the casserole dish with a thin layer of sauce.  Take one crepe,


slap a spoonful of cheese filling into the center,

I realize I'm not winning any awards for this photo, but it gets the point across.
flop one side over,


and then the other.


And we have achieved crepehood!

Now you will need to repeat this about 15 more times, placing each one into the casserole dish.


Create alternating layers of sauce and crepes until you are out of crepes.  Be sure to reserve enough sauce to end with a sauce layer.


Bake, covered for 30 minutes. Remove cover and bake for another 15 minutes or so.  It is ready when the sauce is bubbling.


I love this recipe.  It is one of my all time favorite family meals and making the crepes instead of using store bought shells add a nice personal touch to the meal. Pair it with a side salad and you are good to go. 

Sunday, April 17, 2016

Salmon Rolls

Of all my favorite ethnic foods, sushi is my go-to.  I have no qualms with grabbing a roll at the grocery store.  If I want to celebrate a successful day at work, at the sushi bar I sit.  When anyone in my immediate family is having a birthday, the local sushi restaurant is our go-to establishment.

Given all of these sushi-centric eating decisions, it's a little sad that I have not attempted to make sushi at home.  This sadness is only amplified by the fact that I own a sushi rolling mat and a special spoon for tossing the sushi rice.  That's right...I own a sushi rice spoon.  Now I really feel like the big girl on campus.

The mat and spoon were actually a gift...well, sort of a gift.  It was more like a "I'm cleaning out my cabinets and you seemed liked someone who would want this" kind of situation.  Which is exactly how it went down.  I was in grad school, in another life, and one of my classmates was packing up for a move.  He realized he needed to make some serious decisions about what he kept and what he tossed and since I'm a serious kitchen gadget hoarder, I benefited greatly from his downsizing.

I decided to use smoked salmon in my first ever sushi rolls.  Maybe one day I'll have a fish guy that I'll trust enough to buy raw fish from and make sushi out of it.  For now, I'll stick with food I'm 97.3% positive will not give me some sort of weird stomach worm.  For my salmon companion, I went with mango in one roll and avocado in the other.  In my opinion, these are pairings that will have everyone going back for more rolls.

Salmon Rolls

Ingredients:

1 1/2 c. sushi rice
3 c. water
1/2 c. rice vinegar
1 Tbsp vegetable oil
1/4 c. sugar
1 tsp. salt
8 Nori Toasted Seaweed Sheets
8 oz smoked salmon
8 avocado slices
8 mango slices
Soy sauce for dipping

Directions:

In a medium sauce pan, combine water and rice and bring to a slow boil.  Reduce heat to low, cover, and let simmer for about 20 minutes or until all water is absorbed and rice is completely cooked.

In a medium sauce pan combine the vinegar, oil, sugar, and salt.  Heat on medium and stir until the sugar dissolves.  This should only take a few minutes.

Combine the rice and the liquid in a large bowl.  Mix until the rice is well coated.  Let cool completely before working with it.

Once the rice is cooled, lay out your bamboo rolling mat and place a seaweed sheet in the center.


Carefully create a thin layer of rice on the seaweed.  The seaweed is not overly delicate, but it will rip easily so you do not want to get all Incredible Hulk when spreading out the rice.  You also want to be sure your rice layer is thin.  

Bad layering
You'll know you added too much rice once you've rolled it and you get a lot of rice and tiny bit of filling.

Once you have your rice layer, add your filling along the top edge of the rice.  Roll one had an ounce of smoked salmon and 2 slices of avocado.

Good layering
Roll two had salmon and mango.


Using the mat, roll up your sushi.


You may need to use your fingers to keep the filling in place as you fold the top edge over.


The seaweed might slip around a bit as you are rolling so apply consistent pressure, as if you were rolling and shaping bread dough.


Even a sushi novice, such as myself, can get a decent roll on the first try.  Repeat the process until you have all of your rolls and then cut and serve.


I really enjoyed both rolls, but I think my favorite was the salmon and mango.  The salty, smoky flavor from the salmon paired amazingly with the sweetness of the mango.  Two rolls made the perfect weekend lunch.  Enjoy!

Sunday, April 3, 2016

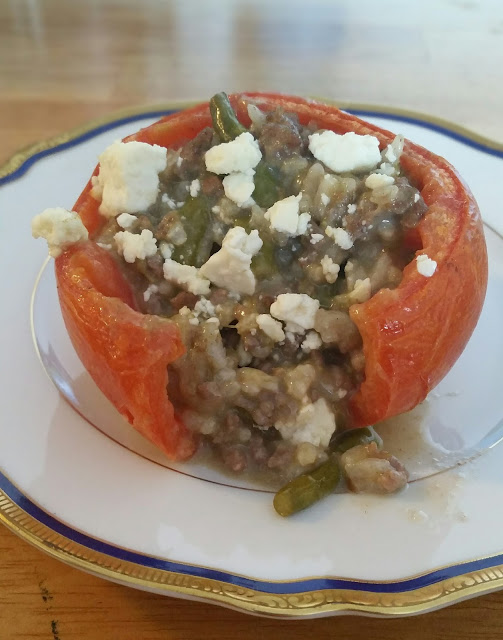
Beef Risotto Stuffed Tomatoes

If you read last week's post, you know I began a quest to make recipes involving each state's food.  We had pecan and blackberries for Alabama and today we have tomatoes and rice for Arkansas.

Tomatoes and rice, tomatoes and rice...really? I'm not sure what I think when I think about Arkansas, but I doubt tomatoes and rice would have ever made the list.  Apparently I need to become better educated on agriculture in the South.

Anyway...when I thought about these two ingredients, it didn't take long for the word "stuffed" to get thrown into the mix.  I was imagining something along the lines of a stuffed pepper, just subbing tomatoes for peppers.  Then I remembered that I had arborio rice in the pantry.  Then I thought about the ridiculous amount of ground beef I had in the refrigerator from the grocery store's stock up sale and that pretty much sold me on the latest recipe.

I realize it does sound completely random...tomatoes stuffed with beef risotto.  Even the beef risotto sounds weird.  I promise you, once the asparagus and goat cheese get added all is right with this recipe.

Beef Risotto Stuffed Tomatoes

Ingredients:

8 lg tomatoes
Salt & Pepper
2 Tbsp butter
2 Tbsp vegetable oil
1 lb asparagus - cut into 1 inch long pieces
1 shallot - diced
1 lb lean ground beef
1 c. uncooked arborio rice
1/2 c. white wine
4 c. beef broth
4 oz. creamy goat cheese
2 oz. crumbled goat cheese

Directions:

Cut the tops off the tomatoes and remove the center.  


Sprinkle the inside with salt and pepper then place upside down on a baking sheet. Let them rest in the refrigerator while you prepare the risotto.

In a large pot, over medium high heat, melt butter and add the vegetable oil.  Add the cut asparagus and cover.  Cook for 5 minutes.  Add the diced shallots and cook until tender, about 3 to 5 minutes.  

Add the ground beef and cook until it is no longer pink. Add arborio rice and mix well.  


Add the white wine and cook until it has evaporated completely.  Begin adding broth, a 1/2 cup at a time, adding the next 1/2 cup once the previous one is completely absorbed/evaporated.  I suggest start taste testing at 3 cups of broth, you want the rice to be fully cooked but firm.  Once the desired consistency has been reached, remove from heat and add the creamy goat cheese.  Mix until fully incorporated then set aside.

Set oven to broil and remove tomatoes from the refrigerator.  Tomatoes should be drained of their excess liquid by now.  Clean off the baking sheet and put the tomatoes back on it, right side up.

Once the oven is heated, broil tomatoes for about 7 minutes. Skin should be just beginning to brown and blister.


Once the tomatoes are done, remove from oven, and reduce heat to 350F.  Fill the tomatoes with the risotto and top with the crumbled goat cheese.


Bake in oven for 15 minutes.


Mmmmmm, these were tasty.  The goat cheese gave a nice tang to the savory nature of this dish.  Having the meat prepared with arborio rice made it a very hearty dish.  Even the largest of the tomatoes could only hold about 1/4 cup of filling, so two of them together made for a great lunch.

Sunday, March 6, 2016

Pork Shepard's Pie

I feel confident stating we've all had experiences with Sheppard's Pie, that layered concoction of ground beef, mixed veggies, and mashed potatoes.  At its core, it's sort of amazing.  All the necessary food groups in a single dish, so if you are in a rush or not someone who likes getting crazy in the kitchen then it's perfect.  Brown some meat, move it into a 9x13, throw a bag or two of frozen mixed vegetables on top, finish with mashed potatoes.  I would even argue it's better to use the dehydrated flakes for this dish, which makes life that much simpler.  Pop it in the oven and 30 minutes later you have dinner. 

Most would say you shouldn't mess with perfection. So why mess with the basic Sheppard's Pie?  Well...because I can.  I had roasted a pork shoulder, which is maybe not the wisest choice when you are cooking for one.  You end up with POUNDS of pork in the fridge.  At that point you need to get creative with ways to use up a lot at once.  I stood in the middle of my kitchen and did a 360, evaluating everything I already had at my disposal... pork, about 3 pounds of potatoes, and an assortment of frozen and fresh vegetables....hmmmm.

It sounds like I have at least two thirds of a Sheppard's Pie, but can you really make it with pork as opposed to beef?  Do I dare?  I ask myself this as I stare at a mountain of pork.  Oh do I ever dare!

 
Pork Sheppard's Pie
 
Ingredients:
 
4 c. cooked pork shoulder - diced
4 Tbsp butter
3 carrots - diced
1 medium onion - diced
2 celery stalks - diced
1/4 c. flour
2 c. chicken stock
1 c. frozen mixed vegetables
3 lbs. Russet potatoes
1/2 c. sour cream
Milk and butter as needed for potatoes

Directions:

In are large skillet, melt butter and saute onions over medium heat until softened, about 7 minutes.  Add carrots and celery, saute for an additional 7 minutes.


Add the flour and mix until you have that pasty brown concoction in your pan. Add the stock and mix until that paste is dissolved.  Add the pork and simmer until thickened, about 10 minutes.


When ready, transfer to a 9 x 13 casserole dish.  Shake the cup of frozen vegetables over the top.  Now, we switch to the mashed potatoes.  Peel and quarter the potatoes. Boil until they are tender, drain, and put back in pot.  Add milk, butter, and sour cream then mash together.  You will have a lot of mashed potatoes.

At this point you could just dump all of the mashed potatoes on top of everything else in the casserole dish then pat down with the back of a spoon.  However, I'm a rather particular individual.  I wanted an even layer and I didn't want to get the frozen veggies mixed into the potatoes.  Therefore, I went the uber fussy route.  I placed spoonfuls of potatoes down, one at a time, and gently created a thin layer of potatoes.  Then I dumped the remaining potatoes on top and patted it all down to create a flat top.  I told you, I'm particular.... with a dash of fussy.


When you are ready, pop this bad boy into an oven that has been heated to 350 degrees Fahrenheit.  Bake for 30 minutes. 


Hungry yet?


Sunday, January 31, 2016

Old Fashioned Neapolitan Lasagna

Why is this an old fashioned lasagna?  Well, no idea.  That is simply the title Maria Luisa has chosen to provide so we're sticking with it.  Old fashioned or not, it proved to be a tasty lasagna, an opinion seconded by the friend I had over for dinner that night.  Since it was more meat and less veggie, I chose to serve it with a side of Brussels Sprouts Parmigiana.  Also tasty.  My only complaint is with the Brussels sprouts...yet again it's a 2 inch long recipe taking up space for no real reason.  I realize I sound like a cranky old lady, but I truly believe that recipes in a cookbook should involve more than boil sprouts, put in dish, add melted butter, sprinkle on cheese, bake.  I probably would have done that anyway.  I put cheese on everything.  I might not have baked it since baking the sprouts added I'm not even sure what.  Oh, whatever.  I'm over it.  At least the lasagna took some effort.

Maria Luisa did not get very specific with the type of beef she wanted me to use, just that it needed to be chopped.  I chose to go with stew beef that I then cut into even smaller pieces.  I have to say, it was really nice biting down into a hunk of meat as I was eating the lasagna.  Mixed in with the beef was some spicy Italian sausage, so there were pieces to sink your teeth into and a little heat as well.  This was definitely a meat lovers lasagna.  The Debbie Downer aspect was that, once again, we were expected to use tomato paste diluted in water....yuck.  I had a jar of marinara in the fridge so I substituted that for the diluted paste.  This also aided in the flavoring of the sauce and helped to keep the acidity down.  The additional flavors were essential.  Maria Luisa did get a little crazy this time around, we put a whole 1/4 teaspoon of marjoram in with the meat.  However, that and the single garlic clove that was removed halfway through is not enough to flavor lasagna sauce.  I highly suggest following my lead and using a basic jarred pasta sauce....no one will ever know.

Old Fashioned Neapolitan Lasagna
Lasagne Napoletane all'Antica

Ingredients:

8 no boil lasagna noodles
2 slices bacon - finely chopped
4 Tbsp butter
1 clove garlic - leave whole
1/2 a medium onion - finely chopped
2 Tbsp carrot - finely chopped
1 Tbsp celery - finely chopped
1 tsp. parsley - chopped
1/2 lb beef - chopped
2 spicy Italian sausage links - casings removed
1/4 tsp. marjoram
1 large can diced tomatoes
2 c. marinara sauce
1/2 c. dry white wine (I went with Villa Marchesi Pinot Grigio)
1/2 lb. ricotta cheese
1/4 tsp. salt
1 egg - beaten
1/2 c. Parmesan cheese - grated
1/2 small mozzarella cheese - diced
Salt and pepper to taste

Directions:

In a large saute pan, melt butter then saute bacon, garlic, onion, carrot and celery for 5 minutes.  


Discard the garlic and add the beef, sausage, marjoram, and parsley,  Simmer until the meat has browned, approximately 5 minutes.


Drain off some of the excess juice then add the wine.  Cook until the wine has evaporated, about 10 minutes.  Add the diced tomatoes and tomato sauce.  Simmer, uncovered, for 30 minutes.  Season to taste and then continue cooking until sauce is thick, about another 10 minutes.


Mix the ricotta, egg, Parmesan cheese, and a bit of salt and pepper together.  Cover the bottom of a 9 x 13 baking dish with sauce.  Make a layer of lasagna noodles then one of cheese.  Dot with some of the mozzarella then repeat.  Cover with sauce and a few mozzarella pieces.  Bake in an oven preheated to 375F for 30 minutes.


Brussels Sprouts Parmigiana
Cavoletti alla Parmigiana

Ingredients:

2 boxes frozen Brussels sprouts
4 Tbsp butter - melted
1/4 c. Parmesan cheese - grated

Directions:

Preheat oven to 350F.  Cook Brussels sprouts in salted boiling water for 5 minutes  Place in a buttered baking dish, pour butter over them, sprinkle on cheese.  Bake for 20 minutes.


Yea, that's an actual recipe in Maria Lusia's cookbook.  She's lucky it tasted good, otherwise I'd scream.


And there are my two Italian dishes on my Hungarian map table runner.  I was feeling very international that evening.

Sunday, November 8, 2015

Loin of Pork Bologna Style

This cookbook never ceases to confuse.  I honestly do not believe that I would be exaggerating when I write that when everyone hears or sees the words "Bolognese sauce," they think hearty meat sauce with chunks of tomato.  Bolognese sauce, in my opinion, is a stick-to-your-ribs, perfect for a winter day, sauce that is meant to top any broad flat pasta.  No one thinks, "oh, milk." I'm face palming right now.  I'm face palming so much there is a bruise on my forehead.

But, BUT, I decided to give Maria Luisa the benefit of the doubt and I took to Google the way I always do in such confusing situations.  First, I googled the English title to her recipe.  I received some disheartening results all related to pork bologna... that overly processed pressed meat poser.  I immediately pictured a slice of bologna and a slice of a Kraft single between two slices of Wonder Bread, felt dirty, and had to shower.  Once I cleansed, I returned to the internet.  Maria Luisa's Italian translation only gave me the results I expected when I typed "Bolognese."  Every result was a different website and their version of a hearty meaty red sauce, the Bolognese we all recognize. 

I did not despair, however.  Even if Maria Luisa's names failed, there was still one more option - the literal description of what I was cooking.  I searched "pork loin in milk sauce" and finally found what I was looking for - confirmation that this recipe is actually a thing.  According to the Italian Kitchen Secrets, pork in milk sauce is a thing.  She writes that this was something she ate regularly growing up.  There are several other recipes for pork in milk sauce.  The themes running through those, which are sadly lacking in the version I now possess, would be herbs and fat.  The other recipes include garlic and rosemary.  One adds sage as well.  They all, also, require the use of whole milk.  Maria Luisa does not explicitly state what type of milk to use.  Maybe in 1955 there were no other options, but I could have benefited from some spelling out of the fat content.  So, once again, I have a good tasting meat with a sadly lacking sauce.  And, lest we forget, the idea that this recipe should be considered Bologna style is debatable.

Loin of Pork Bologna Style
Maiale al Latte alla Bolognese
Ingredients:
4 lbs lean pork loin
6 Tbsp butter
1 qt milk (use whole milk)
Salt and pepper to taste
Directions:
Rub salt and pepper into the pork and let sit in the refrigerator for about 8 hours.  When ready to cook, melt butter in a large saucepan.  Brown the meat on all sides.

Add the milk and simmer, covered, for about an hour and a half.  Before you take it off the heat, check that its internal temperature is at least 145F. 

The sauce left in the pan should be a creamy consistency and Maria Luisa suggests adding white canned truffle to it then serving with the pork. The other recipes I found suggest cooking this a day ahead of time and serving cold.


I ate this the same night I cooked it (i.e. it was warm) and did not add the truffles.  The meat was nice and tender and did have a slight creamy taste from having been cooked in milk for over an hour.

I will say this for Maria Luisa, so far the majority of her recipes do not take much effort and include things most of us already have in the pantry or refrigerator.  If we do not already have the ingredients, it is just a quick trip to the store.  For anyone who prefers to keep things simple in the kitchen, these recipes should be very appealing.


Sunday, October 11, 2015

Fillets of Cod Florentine

Oh Maria Luisa, how I wanted to hate this recipe, especially since you required me to make a sauce for this dish.  However,  it is pretty tasty and rather simple, so I am forced to put this one in the win column and save it for future use.

Of course, this recipe is not without its faults.  The cod fillets are both simmered on the stove and then baked in the oven, which I find to be overkill.  Why it was too difficult for her to just pick one is beyond me.  Cod does not require a long cooking time and therefore can easily be overcooked, which results in a rubbery texture.  No one wants rubbery fish Maria Lusia!

My other issue is with the spinach.  Granted, we do live in a time of pre-cut, pre-washed, bagged spinach. Maybe cooking the spinach in salted water THEN sauteing in butter was necessary for edible spinach in 1950.  Today, that translates to cooking your spinach to within an inch of its life.  Have I steamed and then sauteed greens before?  Sure, greens like swiss chard that are typically a bit tougher.  The leaves may be soft but the stems and veins are not.  But seriously, overcooked spinach just looks sad and we do not want unhappy food.

For the sake of being true to the recipe though, I prepared it as instructed.

Fillets of Cod Florentine
Filetti di Merluzzo alla Fiorentina

Ingredients:

8 small fresh cod fillets
2 lbs spinach - bagged, cooked in salted water then sauteed in butter
1 1/2 c. dry white wine (I chose Sauvignon Blanc)
1/3 c. Parmesan cheese - grated
1 c. Mornay Sauce (recipe below)
Salt and pepper to taste

Directions:

Cook the spinach first.  Using a large sauce pot, bring just an inch or two of salted water to a boil.  Add the spinach and cover, cooking for just a few minutes.  Once the spinach on top begins to darken in color, drain the spinach, and transfer it to a large saute pan with melted butter.  Saute for about 5 minutes.  Drain the excess liquid then put the spinach in a 9 x 13 inch baking dish.


Next, make the Mornay Sauce...

Mornay Sauce
Salsa Mornay

Ingredients:

4 Tbsp. butter
1 heaping Tbsp. flour
1 1/2 c. milk - whole or 2%
1/2 tsp. salt
2 Tbsp. Parmesan cheese - grated
1 egg yolk
dash of pepper
dash of nutmeg

Directions:

Melt the butter in a small saucepan then add the flour.  Stir until smooth (you are making a roux).  Add the milk and cook over a low heat for 10 minutes, stirring continually.  The sauce should thicken.  Add spices, stir, then remove from heat.  Rapidly stir in the cheese and egg yolk.  This should make about 1 1/2 cups.  Store in an air tight container if not using immediately.  It should last about one week in the refrigerator. 


Now, on to the fish....Place the fillets in a large saute pan.  Make sure there is no overlap.  Sprinkle with salt and pepper then add the wine.  Bring to a boil then reduce to a simmer.  Simmer for 10 minutes.  Remove the fillets and place them on top of the spinach.  Pour on the Mornay Sauce and sprinkle on the cheese.


Place in an oven preheated to 350F and bake for 15 minutes.


I paired my Cod Florentine with purple fingerlings from the farmers market.  They were boiled and mashed with just a bit of milk, butter, and garlic.  Mmmm, purple mashed potatoes.

My advice after doing this...pick one of the cooking styles for the cod.  If the Mornay Sauce is being prepared at the same time, just simmer the fish in the wine.  If the sauce was made previously, jump to the baking portion.  As for the spinach...buy it bagged and only saute it in a little butter.

Aside from the complaints, this is a good meal.  It's also easily increased or decreased so it is a great meal to make when company comes over.  A few extra cod fillets, a little more spinach, and you have a meal that will taste good and presents well on a large platter.  So, for the American hostess for which Maria Luisa's cookbook was intended, it is a win.

Sunday, October 4, 2015

The Italian Cookbook Challenge

At a girls' night several weeks ago I introduced some of my friends to a gem of a 1950s cookbook, Maria Luisa Taglienti's The Italian Cookbook.  I had taken it as one of my keepsakes when my family cleaned out Poppy's house.  I'm calling it a gem because it has such choice sentences as "And, as with every recipe in this book, they have been carefully tested and have been set down in a form of measurement and direction that will be familiar to the American housewives and hostesses for whom this book is intended" (p. vi).  Oh 1950s, may your views on the home go the way of the Dodo.  The ladies did comment that it is a shame neither of my grandparents had written comments into the margins and maybe this is my opportunity to pull my own version of a Julie and Julia.

Truth be told, considering the fact that we found this cookbook in the bedroom not the kitchen, its rather pristine condition, and that generation of my family is straight from Italy makes me think possessing this book was actually a joke.  It's in my hands now though, so we are going to embark on a Brianne and Maria Luisa adventure.  This book is going to get the margin comments it deserves and I'll chronicle the exploits here as I have with everything else.  I won't go recipe by recipe, but I'll do my best to make all of them... there are a couple of recipes that use eel and I have no idea if I'll be able to find eel around here, but we'll see.  I'll also break it up with non Italian Cookbook recipes.  This may sound blasphemous, but even Italy will get old after awhile.  So buckle up my people, things are about to get interesting!


Adventure number one from The Italian Cookbook is Loin of Pork in Red Wine, Maiale al Vino Rosso.  After my initial read-through of the recipe, I have to say that this is not a book for beginners, contrary to what a few Amazon reviewers said.  [I did my due diligence on both this book and Maria Luisa and there really isn't much to say on either subject.  There are still a copy or two of either the first or second printings of this book, but they are way overpriced.  Maria Luisa is allegedly a member of a family that, at least at the time, was quite well connected both socially and politically.  She moved to the United States after World War II with her husband, an American soldier, she met during the war.  Internet searches will only produce results that are based on this one cookbook and one very random college blog post written by a grandchild discussing her.  None of this put me off from questioning her book's subtitle claiming she is an "Italian expert".  I may be an American, but I'm not about to move to another country and claim to be an expert on burgers and apple pie.  But I digress and you all can judge for yourselves.]

So, before my tangent we were discussing how not basic this cookbook is.  Maria Luisa reduced the cooking instructions to such a bare bones level, if you do not already know your way around the kitchen you might easily get lost.  In this recipe in particular she lists "1 clove garlic" as an ingredient and then instructs you to rub it on the pork loin.  Honestly, I have visions of 1950s housewives rubbing down a pork loin with a whole garlic clove then wondering what sort of voodoo flavor infusion is supposed to be occurring.  I think it's time we just straight to the recipe and I'll air my grievances as we go along.

Loin of Pork in Red Wine
Maiale al Vino Rosso

Ingredients:

5 lbs. pork loin
2 cloves garlic - minced
1 c. red wine (full bodied, Maria Luisa suggested Barolo)
1/2 c. tomato pasted diluted in 1 c. water
Salt
Pepper

Directions:

Mince garlic onto the meat and rub in along with the salt and pepper.  Heat up a medium sauté pan over medium high heat.  Make sure it's heated before putting in the meat.  You are going to brown the pork in its own fat therefore you want to hear it sizzle as soon as it hits the pan.  Brown for about 3 minutes on each side.


 Reduce heat, add wine, cover, and simmer until the wine has evaporated - approximately 15 minutes.  You should notice a distinct change in smell; the hot wine scent at the start will have gone away.  Turn at least once during this time so that the meat is cooking evenly.


In case you were curious about what wine I chose, I went with a Toscana from Monte Antico.  It's a blend of Sangiovese, Cabernet Sauvignon, and Merlot from various Tuscan vineyards.

Add the diluted tomato paste and simmer pork for another hour, turning occasionally.  Before taking the meat off the stove, be sure to check its temperature with a meat thermometer.  You'll want it to be between 145F and 155F.


Now, at this point Maria Luisa says you can serve the pork with or without the sauce and that the sauce will be a treat when served with pasta.  No, just no.  The sauce is fine being served with the pork, but I do not think it's necessary and frankly, adds nothing to the enjoyment of the meal.  As for "being a treat," absolutely not.  The sauce, as a standalone item, tastes like you boiled a pork chop in tomato soup.  Why you would then wish to add that to your spaghetti is beyond me.  In my humble opinion [which, as we have all realized by now, is anything but humble] you do not need the tomato paste at all.  Add a little thyme and rosemary to the garlic, salt, and pepper rub and forgo the tomato paste all together.  If you are worried about the amount of liquid in the pan add a little bit of water, maybe some vegetable stock, or if you happen to be me, more wine.  The meat will come out beautifully and the gravy will be better for it.


The being said, I stuck to the cookbooks original recipe and am still quite pleased with the result.  The pork is very tender and juicy.  It was also a good meal to cook when temperatures are still on the high side since cooking on the stovetop does not usually spike the temperatures in the apartment the way roasting something in the oven will.

So, that is one recipe down and only 419 more to go!