Sunday, December 27, 2015

Roman Cheese Pudding

Okay, I get it.  Nothing about the name "Roman Cheese Pudding" sounds even slightly appetizing.  I promise though, if you give it a chance you will be glad you did.  Think baked lemony cannoli filling and you'd be on the right track.  It is a bit strange to think about and the fact that I had to sieve the ricotta sent me into fits, but this is good stuff.  I shared my finished product with colleagues at work and no one was disappointed.

I made a couple adjustments, one being the direct result of the other, and both being a product of my laziness.  The directions call for using a mold and when I think of mold I think of jello salads I used to eat as a child.  I'm pretty sure that type of mold is what Maria Luisa was getting at.  However, I only have a bundt pan that is about 3 times the size I actually needed.  I could have gone to the store and found myself a mold, but I was not really up for the hunt.  Instead, I used my bundt pan and doubled the recipe so that it wouldn't look dwarfed inside the thing.  Below is the regular recipe, not the doubled version I made.

Roman Cheese Pudding
Budino di Ricotta alla Romana

Ingredients:

1/2 lb. ricotta cheese
1/2 c. sugar
2 egg yolks
3 whole eggs
1/4 tsp. cinnamon
grated peel of 1 small lemon
1/4 tsp. salt

Directions:

Preheat oven to 325F and grease mold.  Sprinkle mold lightly with bread crumbs.  Be careful with your bread crumb selection.  I only had Italian style bread crumbs in the pantry and didn't really think about it when I used them to prep the pan.  Italian style bread crumbs have parsley flakes.  Those parsley flakes will adhere to your pudding.  It doesn't change the flavor but it will make your guests look twice at the edges when they cut a slice.

Using a wire mesh strainer and the back of a spoon or spatula, sieve the ricotta into a bowl.


Still not sure what that really added to the overall recipe but that is what sieved ricotta will look like.

Now, add the sugar and mix well.  Blend in yolks and, one at a time, add the whole eggs.  Beat constantly throughout this part.  I used a stand mixer since I didn't think I would have enough hands to crack, add, and beat all at the same time.  Blend in the remaining ingredients.  Pour mixture into the prepared mold.


Place mold in a pan of water.  You will, essentially, be cooking this pudding in a bain marie - a fancy term for hot water bath.  This creates a more uniform level of heat around the mold and the steam will keep the pudding from drying out.

Bake for approximately 1 hour or until a toothpick comes out dry.  With my doubled version I had to bake it for 1 hour 10 minutes.


There were some obvious removal issues.  For the most part it plopped out nicely, but there were some spots that stuck to the mold.  Now, this could very well be my fault.  Maria Luisa did not provide any instruction regarding removing the pudding from the mold.  Part of me said that if I let it cool in the pan too much it might end up sticking to the sides and never come out.  The other part of me said I needed to wait until it cooled at least a bit so that I was sure it was properly set.  
 
I ended up waiting a whole 5 minutes then turned the mold upside down.  Therefore, the case could be made that had I waited until it cooled, this would not have happened.  But, those could have simply been trouble spots on the mold where there wasn't enough butter and breadcrumbs so it would have stuck regardless of when I tried to remove it.  Maybe next time around I wait until it cools before removing it.  Maybe next time I use a pan that is more appropriately sized.  Honestly, who knows.


What I do know though, is that this pudding tastes pretty great.  It has a nice smooth texture with a light hint of lemon.  The extreme number of eggs makes the dessert rich and creamy.  It's worth trying for your next dinner party.

Sunday, December 20, 2015

Holiday Sweet Treats

COOKIES COOKIES COOKIES!


I adore Christmas cookies.  Growing up, my mother had these magical tins that only appeared in December and when you opened them they contained sweet goodness.  The sheer number of the different kinds of cookies she would make was amazing and we all had our favorites.  Personally, I preferred the giuggiulena, spritz, and pecan cups.

Giuggiulena
The giuggiulena are a bit of a beast to make.  You boil sugar and honey together then add sesame seeds and blanched almonds.  The mixture needs to be worked while it's still warm, otherwise you'd break your arms trying to roll it out and then cut it into pieces.  Of course, working with it warm has its downside.  It's still sticky so the board, rolling pin, and knife all have to remain wet to prevent the giuggiulena from sticking to it.  When all is said and done though, you have these rock hard sweet toffee treats.  They are the kind that you have to bite into with your back teeth and no holiday cookie dish is complete without them (in my never humble opinion).

My brother's favorite is the almond paste...no argument here, they are pretty fantastic as well.  Over the years we've added a few new ones to our baking repertoire.  The latest addition, which has also found its way to my favorites list, is the Mounds cookies (the ones in the center of the dish pictured at the top).


The newspaper my mother clipped the recipe from called them Chocolate Dipped Peter Pan Mounds. I've seen other versions, usually named Peter Paul Mounds bars, floating around the internet.  I think the version my mother uses is way better, so I thought I would share.

Chocolate Dipped Peter Pan Mounds

Ingredients:

3/4 c. mashed potatoes (my mother makes the mashed potatoes the way she would make any regular mashed potatoes, with milk and butter.  My suggestion is to do the same.)
4 c. powdered sugar
4 c. coconut flakes
12 oz. chocolate chips
1/2 bar paraffin wax (please make sure it is food grade!)

Directions:

Make the mashed potatoes and set aside to cool.  Once they have cooled completely, mix with the powdered sugar and coconut.  Chill for 30 minutes.

Form into bite-sized balls.  My preference is to shape them like Mounds.  Chill for an hour.

In a double-boiler over medium heat, melt paraffin wax.  Add chocolate chips and stir.  Keep over warm to keep chocolate thin.

Remove the as yet to be dipped Mounds from the refrigerator.  Dip each one using a fork into the chocolate.  The newspaper directions also suggest using a toothpick, but I am not confident a standard toothpick can handle the weight of these bad boys.  Use the fork to stay on the safe side.

Place on wax or parchment paper and let set in cool room or put back into the refrigerator for an hour.

Store in a covered container in the refrigerator (if they even last that long). 


Sunday, December 13, 2015

Sweet Potato and Apple Casserole

This casserole goes down in the win column and my friends who partook of it at Friendsgiving agreed.  I always get a little nervous though when I serve food to others.  It's an irrational nervousness, I do realize that.  I've been cooking long enough and have a good sense of things that go well together, but there is always that chance that something comes out wrong.  And, if you have read my post about cooking with my father, you already know that me, cooking with orange juice, is a bit of a mixed bag, and this recipe called for juice of an orange.  I'm already feeling the cold sweats of fear as I imagine all the ways that OJ in the oven could cause a sticky smelly disaster.  But, as we have all figured out by now, I survived to tell the tale and bested yet another one of Maria Luisa's recipes.

What I like most about this recipe is its simplicity...sweet potatoes, apples, and orange juice.  That is really all you need.  There is a sweetener and spice thrown into the recipe as well, but those are not essential.  The standout flavor comes from the three ingredients I just listed and it's wonderful.  Maria Luisa did suggest adding liquor, but I decided that was unnecessary.  She also put this recipe in the Dessert and Candy chapter of her cookbook, which I decided was stupid.  Therefore, ignoring the alcohol addition was easy.  I might have considered it IF, IF, she had added it before baking.  She suggested sprinkling on Jamaica rum or kirsch before serving.  A) That's gross and adds nothing.  B) I was taking this to a pot luck where children would be dining with us, so no. C) Kirsch?! I'm not really sure why she wants us growing hair in unnecessary places.  Feel like getting crazy and throwing in an ounce of rum with the orange juice and then baking?  Go for it.  That would probably taste good...but after? No.

Setting aside Maria Luisa's general level of ridiculousness, this is a great recipe.  It's also a good beginner level recipe.  The ability to slice and peel is as skilled as you need to be.  Though, as I am writing this I am remembering a day when a dear dear friend of mine proved that peeling a potato does indeed require skill.  I stood, in abject horror, watching her massacre a normally hearty russet potato.  Before she could demoralize Mr. Russet any further, I yanked him from her grasp and told her that if she wanted to help, she could pour the wine.  Things worked much better in the kitchen after that.  As long as you are not her, you can make this recipe easy peasy.

Sweet Potatoes and Apples
Dolce di Patate e Mele

Ingredients:

2 lbs. sweet potatoes
3 apples - peeled, cored, and sliced fairly thin
Sugar and nutmeg - enough to sprinkle on as directed
Juice of 1 1/2 oranges
2 Tbsp butter - melted

Directions:

Preheat oven to 325F.  Boil the sweet potatoes in water until tender, about 20 minutes.  When they are done, drain, let them cool for a bit, and then peel.  Peeling sweet potatoes is super easy and should not even require a peeler.  The skins will come off right in your hands.

Cut the sweet potatoes into slices, approximately 1/2 inch thick.  You will create the casserole in layers, in a buttered baking dish, starting with the sweet potatoes,


then adding the apples,


and then sprinkling on some sugar and nutmeg.


In total, I probably used about 1/4 cup of sugar and a single teaspoon of nutmeg.  Keep repeating until you have used all of the sweet potatoes and apples.  I ended up with three layers of each.  Finish with a sprinkling of sugar and nutmeg.

Then, pour the juice and melted butter over the top.


Place in the oven to bake for 30 minutes.


Yea, I had this vision of a dark brown and bubbly something but that's not what you get here.  The time in the oven is really just meant to soften the apple slices.  It tastes phenomenal and smells even better as it cooks, that I promise you.  If autumn could be captured in a pan, it would be this.

Sunday, December 6, 2015

Cod Mistral

First, let's discuss the title Cod Mistral.  I have no idea what mistral is so I looked it up with the handy dandy Google Tranlate.  It detected mistral to be English.  Since both the English and the Italian translation of this dish contain the word mistral - unhelpful.  The definition I was given for the English version of mistral was "a strong, cold northwesterly wind that blows through the Rhône valley and southern France into the Mediterranean, mainly in winter."  Soooooo, I made Cod Northwesterly Wind?  This are one of those moments where I just throw up my hands and give up.  Maria Lusia, why do you insist on making me nuts?!

Stupid nonsensical translations aside, this was a tasty dish, except for one thing.  There is always a but isn't there.  Maria Luisa made me double cook my cod again.  I do not enjoy double cooking cod because I run the risk of the rubbery texture.  And two of my fillets, the thicker ones, were rubbery...no buono Maria Luisa, no buono.   Now, for anyone saying "you could have just ignored the instructions to both sauté and bake," yes, I could have.  However, I feel a bit more justified in my ranting if I follow her instructions.  Had I intended to serve Cod Northwesterly Wind to anyone other than myself, I most certainly would have chosen to only bake the fish.

I should also admit a faux pas of my own...I used a French wine.  I know, total sacrilege but, it said dry right on the label, I had to pick it - Monsieur Touton Sauvignon.

Final rant...what the heck is a moderate oven!  Maria Luisa, why do you give me ridiculous directions?!  I'm not kidding.  The last sentence for the directions of this recipe are, and I quote "Bake in a moderate oven for 15 to 25 minutes" (pg 106).  ARGH


Cod Mistral
Merluzzo alla Mistral

Ingredients:

8 cod fillets - dipped in flour
1 c. olive oil
1 lb. tomatoes - peeled and diced
2 cloves garlic
2 Tbsp parsley - chopped
1 lb. mushrooms - sliced
6 Tbsp bread crumbs
4 Tbsp butter
Salt and pepper to taste

Directions:

Lightly sauté cod in oil until both sides are golden.  In a 13 x 9 baking dish, sprinkle half of the bread crumbs then place the cod on top.  In the saute pan, add tomatoes to remaining oil along with the garlic, parsley, salt, and pepper.  


Simmer for 10 minutes.  Remove the garlic and add wine and mushrooms.  Simmer until half of the wine has evaporated, approximately 10 minutes.  Pour the sauce over the cod.  Sprinkle the rest of the bread crumbs on top and bake for 20 minutes in an oven preheated to 350F.


Doesn't look like much does it?  Don't worry, it tastes way better than it looks.  The mushrooms held up really well even after being both sauteed and baked.  They were nice and firm...I greatly dislike mushy mushrooms.


And here it is, my first entirely The Italian Cookbook Challenge meal - a protein, carb, and veggie all on the same plate.  And I'm still alive...darn you Maria Luisa, thwarting my best efforts to give poor marks on your ridiculous cookbook.  There is always next week!  Buon appetito!

Sunday, November 29, 2015

Green Bean Souffle

I've always thought of the soufflé as this really scary concoction that requires ultimate precision otherwise it comes out a mess. I haven't changed my mind.  However, now that I have tackled the ominous first soufflé, the idea of doing it again does not necessarily make me quake in my booties.  Check back with me when I decide I've lost my mind enough to try a dessert soufflé and we'll see if I've maintained a façade of cool.

It's really the whole idea of folding in ingredients.  And the egg whites.  Yea, definitely the folding and the egg whites.

I did manage to get the egg whites nice and stiff..... so stiff that the egg white was this giant fluffy puffy ball inside of the whisk attachment to my Kitchen Aid. 


Then the whole folding thing needed to take place.  The entire time I'm very slowly and very carefully placing my wooden spoon in the bowl at the end farthest from me and sliding it down to the bottom, bringing the spoon along the bottom over to me, and then slowly back up again and over the top of the mixture, thinking to myself that this is insanity.  I'm looking around at an empty apartment desperately trying to use the powers of my mind to make someone else magically appear so I have can ask, "is this right?". There are just globs of egg white and cream sauce mixture semi sort of floating together in this bowl.  Folding is madness.  All I wanted to do was take my spoon and whip it together with all the power my muscle-lacking arms could muster. But no, its a friggin soufflé, which means I have to carefully fold so as not to lose air.  Losing air means no rise when it cooks.  No rise means that I don't know what I've cooked but I do know it isn't a soufflé.  Not having a soufflé at the end of this madness would defeat the purpose of my making a green bean soufflé.  Stupid green bean soufflé.


But I did it and I even got a little rise.  I know I got a rise out of my soufflé because there was obvious sinkage an hour later.  I'll count it as a win and one more challenge tackled.

Green Bean Soufflé
Soufflé di Fagiolini
Ingredients:

1 box frozen cut string beans
5 Tbsp butter
1 Tbsp flour
1 c. whole milk
3 Tbsp Parmesan cheese - grated
1/2 tsp. salt
1 egg yolk
2 egg whites  - beat stiff with 1/2 tsp. salt

Directions:

Fill a sauce pot with two quarts water and 1 Tbsp salt.  Bring to a boil then add string beans.  Cook for 20 minutes or until tender.

In a small sauce pot, melt half of the butter then add flour.  Mix into a paste then add the milk.  Put heat on low and cook for 10 to 12 minutes, stir constantly.  Sauce should thicken to the consistency of cream.  Stir in salt.

Remove from heat and rapidly stir in egg yolk and cheese. Set aside.

Drain the green beans.  Melt the rest of the butter in a sauté pan then add the green beans.  Sauté for approximately three minutes.  Put the beans through a sieve then mix with the cream sauce.

Fold in the egg whites.

Place mixture in a buttered baking dish.  Even the top with the back of your spoon.

Currently not looking very appealing...man I hope this works.

Bake in an oven preheated to 350F for 30 to 35 minutes.  Serve immediately.


Heartache from the stress of baking this dish aside, it tasted pretty great.  It had a light creamy texture with a weird bit of sweetness to it.  This recipe is a keeper...I just need to practice my folding technique.


Sunday, November 22, 2015

Cauliflower Soup

It's been a weird fall, almost seems like we missed it somehow.  The weather has been warm except for a few cold days here and there.  However, it is currently mid-November and we are finally looking down the barrel of what should prove to be the longest cold stretch we've had since the season officially started.  What does this all really mean you ask?  It means that I am currently heating my apartment with an oven producing delicious food.  Now, I'm not advocating for using your stove as a primary heating device, that would be dangerous, but Sunday saw the production of 3 quarts of cauliflower soup, 8 baked and Cajun seasoned pork chops, 1 lb of boiled potatoes, and a serving of steamed carrots.  Not a bad day!  And made even better when you realize that most of those items (including the meat) were farm fresh.

The carrots and potatoes were picked up at my local farmer's market.  The pork chops and the bacon that was in the soup, however, now those were from Cugno's Farm in Colchester, Connecticut.  This farm raises a small number of pigs each year that people can buy into.  If you've never done this before you are missing out.  Buy into half a pig and you will end up with a freezer packed with delicious meat you know was raised humanely.  I will recommend against naming your pig though.  Many people seem to have an issue with eating things with names.  I do not suffer from this particular affliction...Loralai Pigginstein made quite the delectable pork chop.  Too far?  Do you want me to go back to the soup?

Cauliflower Soup
Minestra di  Cavolfiore

Ingredients:

1 cauliflower
1/4 c. bacon
1/4 c. olive oil
2 shallots
3 qts. chicken broth
1 Tbsp tomato paste - dissolved in a 1/3 c. of the broth
1 c. ditalini 
Salt and pepper to taste

Directions:

Remove leaves of cauliflower and cut off any bruised spots.  Place it upside down in a large bowl of cold salted water for half an hour.  I am completely baffled as to why Maria Luisa wants me to do this, but I did it anyway.  Honestly, as far as I'm concerned, it did  nothing for the process except waste 30 minutes of my time.


Drain and break cauliflower into flowerets.  I left mine fairly large because I knew that in the end I would be taking a potato masher to it.  Set aside for the time being.

Pour oil into a large sauce pot and over medium heat, saute shallots and bacon.  

FARM FRESH BACON!

Add the tomato paste mixture and simmer for 5 minutes.  Add the cauliflower and simmer for another 10 minutes.


Add broth, cover, bring to a boil, reduce heat to a simmer and cook for 45 minutes.  Using a potato masher, crush the cauliflower into tiny bits. Season to taste.  Add the ditalini and cook until tender, approximately 10 more minutes.


Now, if you are not a cauliflower fan you will not be a fan of this soup.  Once again, this is not an affliction which I suffer from.  I think this soup is great.  It has a savory flavor and hits the spot at lunchtime. 

Sunday, November 15, 2015

Minestrone Milanese

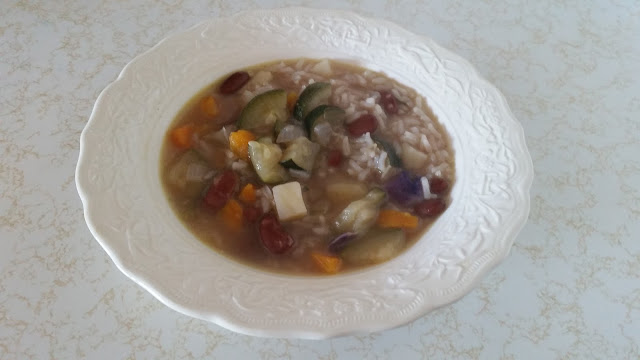
Soup, soup, soup, soup.  I really cannot find the right words to describe why soup makes me so happy, but it does.  It's comfort food at its finest, only made better when using fresh produce from the farmer's market.  Today's offering is Minestrone Milanese and this recipe will have you swimming in soup for the rest of the week.  Now that's an image!

The only hiccup in this, in all other ways wonderful, recipe was the need for salt pork.  What in the h-e-double hockey sticks is salt pork?!  Well, the what is not quite as difficult as the where.  Salt pork is salt-cured pork belly, basically.  The where is the difficult piece to answer since I do not believe it's been in a grocery store since Maria Luisa was compiling these recipes.  I hit up the World Wide Web to see if salt pork is something that can be made at home and, SURPRISE, you can.  Of course, my decision to make salt pork could not possibly go without its own hiccup.  I didn't really have the necessary ingredients for proper salt pork....seriously who sells juniper berries! And, what the hell is quatre épices?

My head was already beginning to explode so I just decided I was going to fake it.  My local grocer sells pork trimmings, which I decided was good enough.  I also decided that I could get away with a salt-ish pork concoction that involved sea salt, brown sugar, peppercorns, and a bay leaf.  I let that sit in the fridge overnight and decided that since I only need 1/3 of a cup for the soup that whatever I pulled out of the zip lock in the morning would suffice.  I have no idea what my "salt pork" did or didn't add to my minestrone, but since I decided my minestrone tastes pretty darn amazing I am a happy woman.


Once I got the whole salt pork situation sorted, I was able to get down to business...

Minestrone Milanese

Ingredients:

1/2 stick of butter
1/3 c. salt pork - diced
1 medium onion - chopped
2 medium potatoes - diced
1 lg carrot - diced
1 medium stalk celery - chopped
2 small zucchinis - chopped
1/2 head small cabbage - shredded (I used red, but that was because that was all the vendor at the farmer's market had.)
1 15 oz can red kidney beans - rinsed and drained
3 qts. beef broth
1 c. uncooked rice
1 Tbsp parsley - chopped
1 clove garlic - minced
1/8 tsp. dried basil
1/4 tsp. thyme
1/3 c. Parmesan cheese - grated

Directions:

Melt butter in a large sauce pot.  Saute the onions in the butter, along with the salt pork, making sure not to brown the onion.  Add the carrots, celery, zucchini, cabbage, and beans.  Cover and simmer for 15 minutes, stir occasionally.  


Add broth and potatoes.  Bring up to a boil then simmer for 1 1/2 hours.  Increase heat to high, add the rice, and cook for 10 minutes.  Add the parsley, garlic, basil, and thyme, cook an additional 8 minutes.  Remove from stove and stir in Parmesan cheese and serve.


Just thinking about this soup makes me hungry.  I love chunky soups and this dish just hits the spot.  I do want to note that Maria Luisa actually took this recipe from a restaurant in Milan, Caffe Ristorante Savini.  Apparently it is still there.  Guess I'm adding Milan and Caffe Savini to my ever growing list of places to go.

Sunday, November 8, 2015

Loin of Pork Bologna Style

This cookbook never ceases to confuse.  I honestly do not believe that I would be exaggerating when I write that when everyone hears or sees the words "Bolognese sauce," they think hearty meat sauce with chunks of tomato.  Bolognese sauce, in my opinion, is a stick-to-your-ribs, perfect for a winter day, sauce that is meant to top any broad flat pasta.  No one thinks, "oh, milk." I'm face palming right now.  I'm face palming so much there is a bruise on my forehead.

But, BUT, I decided to give Maria Luisa the benefit of the doubt and I took to Google the way I always do in such confusing situations.  First, I googled the English title to her recipe.  I received some disheartening results all related to pork bologna... that overly processed pressed meat poser.  I immediately pictured a slice of bologna and a slice of a Kraft single between two slices of Wonder Bread, felt dirty, and had to shower.  Once I cleansed, I returned to the internet.  Maria Luisa's Italian translation only gave me the results I expected when I typed "Bolognese."  Every result was a different website and their version of a hearty meaty red sauce, the Bolognese we all recognize. 

I did not despair, however.  Even if Maria Luisa's names failed, there was still one more option - the literal description of what I was cooking.  I searched "pork loin in milk sauce" and finally found what I was looking for - confirmation that this recipe is actually a thing.  According to the Italian Kitchen Secrets, pork in milk sauce is a thing.  She writes that this was something she ate regularly growing up.  There are several other recipes for pork in milk sauce.  The themes running through those, which are sadly lacking in the version I now possess, would be herbs and fat.  The other recipes include garlic and rosemary.  One adds sage as well.  They all, also, require the use of whole milk.  Maria Luisa does not explicitly state what type of milk to use.  Maybe in 1955 there were no other options, but I could have benefited from some spelling out of the fat content.  So, once again, I have a good tasting meat with a sadly lacking sauce.  And, lest we forget, the idea that this recipe should be considered Bologna style is debatable.

Loin of Pork Bologna Style
Maiale al Latte alla Bolognese
Ingredients:
4 lbs lean pork loin
6 Tbsp butter
1 qt milk (use whole milk)
Salt and pepper to taste
Directions:
Rub salt and pepper into the pork and let sit in the refrigerator for about 8 hours.  When ready to cook, melt butter in a large saucepan.  Brown the meat on all sides.

Add the milk and simmer, covered, for about an hour and a half.  Before you take it off the heat, check that its internal temperature is at least 145F. 

The sauce left in the pan should be a creamy consistency and Maria Luisa suggests adding white canned truffle to it then serving with the pork. The other recipes I found suggest cooking this a day ahead of time and serving cold.


I ate this the same night I cooked it (i.e. it was warm) and did not add the truffles.  The meat was nice and tender and did have a slight creamy taste from having been cooked in milk for over an hour.

I will say this for Maria Luisa, so far the majority of her recipes do not take much effort and include things most of us already have in the pantry or refrigerator.  If we do not already have the ingredients, it is just a quick trip to the store.  For anyone who prefers to keep things simple in the kitchen, these recipes should be very appealing.


Sunday, November 1, 2015

Eggs Florentine

I learned a new skill over the weekend - how to poach an egg.  Poaching an egg is no easy task; it is  incredibly fussy.  Of course that means I did not bother to practice awhile and get my technique down before taking on a recipe that required me to poach six eggs.  "Who practices?" She asks while she rolls her eyes at herself knowing full well that smart people practice.  Nope, you will be witnessing my first ever poaching attempt.  I warn you now, they were tasty but a few look pretty darn ugly. On the bright side, I officially knocked out two more of Maria Luisa's recipes and none of the yolks broke prematurely.

However, no Italian Cookbook Challenge posting would be complete without some sort of complaint.  Don't roll your eyes at me, you know you find my unnecessary anger hilarious.  There are 420 recipes in The Italian Cookbook.  I'm fine with that because I wholeheartedly believe that not only are there 420 Italian recipes worthy of being in a cookbook, there are likely a half dozen other recipes not included for every one that makes it in.  Therefore, I find it more than a little annoying that she gave space to a recipe entitled "Spinach in Butter."  Why?  Why must "Spinach in Butter" take up page space in this book?  Why couldn't she just include "saute spinach in butter" as part of the directions for all the recipes that required buttered spinach?  I love spinach, but this recipe does not deserve the two inches of real estate it took up on a 7 1/2 inch page. [Yes, I measured.]  That being said, you will still find the recipe below.  At this point, it would be plain unfair to not include it after ranting about it.

Spinach in Butter
Spinaci al Burro

[Disclaimer first...I am only giving you the Spinach in Butter recipe first because it is required as part of the first sentence in the Eggs Florentine directions.  These recipes are listed in order of necessity not importance.]

Ingredients:

1 1/2 lbs spinach
6 Tbsp butter
Salt and pepper to taste

Directions:

Fill a large sauce pot with about an inch or two of water and add some salt.  Bring to a boil and then add the spinach.  Cover and cook for about 10 minutes.  Drain well.  Melt butter in a large saute pan and add cooked spinach.  Sprinkle on some salt and pepper.  Stirring occasionally, cook for about 5 minutes.  You want some of the excessive moisture to evaporate off.

Eggs Florentine
Uova alla Fiorentina

Ingredients:

6 lightly poached eggs
1 recipe Spinach in Butter
1/2 recipe Mornay Sauce
3 Tbsp Parmesan cheese - grated
pepper to taste

Directions:

Take the previously prepared spinach and place in a 9 x 9 baking dish.  Level the top with the back of a spoon and place the poached eggs on top.  I poached my eggs for 3 minutes each in simmering water.


Pour the Mornay Sauce on top and sprinkle with cheese.  At no point in these directions does she ever mention the "pepper to taste" ingredient.  I'm going to tell you to add some pepper here or maybe add it prior to the addition of the cheese and sauce.  You could also wait and crack some pepper on top after it's baked...whatever rocks you culinary world.

Bake for 15 minutes in an oven preheated to 350F.


I was a little worried that baking the eggs would cook the yolk completely, but they were still wonderfully runny when I finally pierced them with my fork.  While the poaching process was a little stressful, it was worth it in the end.  The next time I make breakfast for friends they might just find themselves feasting on this recipe.

Sunday, October 25, 2015

R.I.P Tablespoon


It is with a heavy heart that today we say goodbye to Tablespoon.  You have served us well and, on occasion, served us.  You have scooped many an ingredient but, sadly, rice croquettes were literally the death of you.  You will be missed.

I'm not going to lie.  I was just a bit more than devastated to hear and feel the cracking of my tablespoon as I pulled up some rice mixture.  Making these little nuggets was already a test of my patience.  They did not want to stick together on their own and the stickier my hands became, the harder it was to form the balls.  Then the tablespoon snaps in half...a truly sad moment.  I've had that tablespoon for YEARS.  What made it even worse was that I thought back to my very first tablespoon, a tablespoon that is still living comfortably in my mother's kitchen.  It's part of a multicolored set of measuring spoons that came with my very first cookbook Kids Cooking: A very slightly messy manual.  How can a set of measuring spoons that must be at least 20 years old by now have lasted longer than the tablespoon of only 8 years?  Probably because I would never dare use that precious set to scoop rice balls.  Whenever I cook at my mother's I go for those measuring spoons immediately. I love those tablespoons...they may go "mysteriously" missing the next time I visit. I'm going to have to move on now, I'm getting way too nostalgic over baking utensils.

Rice croquettes!

Let's just say there is a reason I do not fry anything...and it's not for health reasons.  My fry skills are less than stellar.  Maybe it was the tightness of my rice balls, maybe it was the temp of the oil, or maybe it was the amount of time the rice balls spent in the oil.  Whatever it was, it produced a comedic show of me desperately trying to rescue disintegrating food from a vat of bubbling oil.  I did manage to rescue several that could sort of be considered croquettes.  Thankfully, as happens in these situations, they tasted better than they looked.

Rice Croquettes Roman Style
Crochette di Riso alla Romana

Ingredients:

2 c. rice
3 Tbsp tomato sauce
4 Tbsp butter - melted
1/2 c. Parmesan cheese - grated
2 eggs - beaten
1 c. mozzarella cheese - diced
1 c. bread crumbs
2 c. vegetable oil

Directions:

Cook the rice in salted boiling water until they are tender but still firm, about 15 minutes.  Drain and set aside to cool.  Once it's cool enough to work with, mix in tomato sauce, butter, Parmesan cheese, and eggs.

Shape into an oblong croquette by spreading 1 tablespoon of rice in the palm of your hand,


place a piece of mozzarella in the center,


top with another tablespoon of rice, and firmly press it all together.


Roll in the bread crumbs.


Repeat until all the rice is used.  I was able to make 34 croquettes.  Fry a few at a time in hot oil until golden on all sides.


As you can see, I was not lying.  These guys came out looking less than amazing.  Thankfully, they tasted great.  The ones that did manage to stay together held up well.  They were firm but soft inside with a nice surprise of mozzarella cheese in the middle.  

If you choose to make these or anything similar, ever, I wish you well!  I think it will be a long time before I tackle croquettes again.

Sunday, October 18, 2015

Salmon-Stuffed Tomatoes

Full disclosure...I did modify this recipe to make it more party app -esq.  It is in Maria Luisa's hors d'oeuvres section, but it calls for large tomatoes.  That would have been fine for a sit-down dinner first course.  However, these little nuggets were going to accompany me to a family reunion picnic so I went with campari tomatoes.  Campari tomatoes were a perfect choice because they are firm and can be quite meaty.  They are also large enough to be stuffed while remaining bite sized.

I also chose not to use her mayonnaise recipe.  Eventually, I will jump feet first into homemade mayo.  However, I decided not to risk exposing my entire family to salmonella.  I will allow Maria Luisa to teach me how to make mayonnaise when the only person consuming it will be me.  Once I am confident in my mayo-making skills, I'll force it onto others.

For about half a second I was deluded enough to think I would use fresh salmon.  Who was I kidding?  Not only would fresh salmon be cost prohibitive but, I don't have time for that nonsense.  It would need to be baked, skin removed, then shredded.  Can, can, can.  Though, as a little PSA, if you go the canned route, know what you are grabbing off the shelf.  Depending on the brand and style of canning, you might have to pick through and remove the bones.  I could provide some imagery to reinforce my suggestion, but I'm sure your own imagination is good enough.

In the end, all turned out well.  The stuffed tomatoes were well received, both in look and taste.  There is something about anything stuffed that immediately gets people interested.  It's like there is a secret treasure inside and everyone wants a chance to discover it.

Salmon-Stuffed Tomatoes
Pomodori Ripieni di Salmone


Ingredients:

4 pkgs. campari tomatoes
1 Tbsp white wine vinegar
1 lb canned salmon - drained
4 Tbsp whipped sweet cream butter
3 Tbsp mayonnaise
1 tsp. lemon juice
Salt and pepper

Directions:

Slice about a quarter of an inch off the top of the tomato and carefully scoop out the center.  Sprinkle the inside of each with salt, pepper, and vinegar.  Chill in the refrigerator for 45 minutes.  Turn them upside down for about 10 minutes to drain the juices that the seasoning has brought out of the tomato. 


While the tomatoes are chilling, prepare the filling.  Using an electric beater, combine the salmon, butter, mayonnaise, and lemon juice in a large bowl until thoroughly whipped.  Using a piping bag (or in my case, a zip lock bag with the end snipped off), fill each tomato just to the top.  Put back in the refrigerator until ready to serve.  This made 36 stuffed campari tomatoes.


My only complaint really came under her ingredient list.  She suggested using tuna as well.  Why call the recipe "salmon-stuffed" just to say salmon or tuna in the ingredient list!  Continuity people, is it too much to ask?  If she wanted to give a variety of options, this recipe should have just been called Stuffed Tomatoes.  Okay, end of rant.

Ending on a high note, these really were very tasty.  Whipping all the ingredients together created a nice light texture and the tomatoes remained firm throughout the picnic.  Well worth trying for your next get together

Sunday, October 11, 2015

Fillets of Cod Florentine

Oh Maria Luisa, how I wanted to hate this recipe, especially since you required me to make a sauce for this dish.  However,  it is pretty tasty and rather simple, so I am forced to put this one in the win column and save it for future use.

Of course, this recipe is not without its faults.  The cod fillets are both simmered on the stove and then baked in the oven, which I find to be overkill.  Why it was too difficult for her to just pick one is beyond me.  Cod does not require a long cooking time and therefore can easily be overcooked, which results in a rubbery texture.  No one wants rubbery fish Maria Lusia!

My other issue is with the spinach.  Granted, we do live in a time of pre-cut, pre-washed, bagged spinach. Maybe cooking the spinach in salted water THEN sauteing in butter was necessary for edible spinach in 1950.  Today, that translates to cooking your spinach to within an inch of its life.  Have I steamed and then sauteed greens before?  Sure, greens like swiss chard that are typically a bit tougher.  The leaves may be soft but the stems and veins are not.  But seriously, overcooked spinach just looks sad and we do not want unhappy food.

For the sake of being true to the recipe though, I prepared it as instructed.

Fillets of Cod Florentine
Filetti di Merluzzo alla Fiorentina

Ingredients:

8 small fresh cod fillets
2 lbs spinach - bagged, cooked in salted water then sauteed in butter
1 1/2 c. dry white wine (I chose Sauvignon Blanc)
1/3 c. Parmesan cheese - grated
1 c. Mornay Sauce (recipe below)
Salt and pepper to taste

Directions:

Cook the spinach first.  Using a large sauce pot, bring just an inch or two of salted water to a boil.  Add the spinach and cover, cooking for just a few minutes.  Once the spinach on top begins to darken in color, drain the spinach, and transfer it to a large saute pan with melted butter.  Saute for about 5 minutes.  Drain the excess liquid then put the spinach in a 9 x 13 inch baking dish.


Next, make the Mornay Sauce...

Mornay Sauce
Salsa Mornay

Ingredients:

4 Tbsp. butter
1 heaping Tbsp. flour
1 1/2 c. milk - whole or 2%
1/2 tsp. salt
2 Tbsp. Parmesan cheese - grated
1 egg yolk
dash of pepper
dash of nutmeg

Directions:

Melt the butter in a small saucepan then add the flour.  Stir until smooth (you are making a roux).  Add the milk and cook over a low heat for 10 minutes, stirring continually.  The sauce should thicken.  Add spices, stir, then remove from heat.  Rapidly stir in the cheese and egg yolk.  This should make about 1 1/2 cups.  Store in an air tight container if not using immediately.  It should last about one week in the refrigerator. 


Now, on to the fish....Place the fillets in a large saute pan.  Make sure there is no overlap.  Sprinkle with salt and pepper then add the wine.  Bring to a boil then reduce to a simmer.  Simmer for 10 minutes.  Remove the fillets and place them on top of the spinach.  Pour on the Mornay Sauce and sprinkle on the cheese.


Place in an oven preheated to 350F and bake for 15 minutes.


I paired my Cod Florentine with purple fingerlings from the farmers market.  They were boiled and mashed with just a bit of milk, butter, and garlic.  Mmmm, purple mashed potatoes.

My advice after doing this...pick one of the cooking styles for the cod.  If the Mornay Sauce is being prepared at the same time, just simmer the fish in the wine.  If the sauce was made previously, jump to the baking portion.  As for the spinach...buy it bagged and only saute it in a little butter.

Aside from the complaints, this is a good meal.  It's also easily increased or decreased so it is a great meal to make when company comes over.  A few extra cod fillets, a little more spinach, and you have a meal that will taste good and presents well on a large platter.  So, for the American hostess for which Maria Luisa's cookbook was intended, it is a win.

Sunday, October 4, 2015

The Italian Cookbook Challenge

At a girls' night several weeks ago I introduced some of my friends to a gem of a 1950s cookbook, Maria Luisa Taglienti's The Italian Cookbook.  I had taken it as one of my keepsakes when my family cleaned out Poppy's house.  I'm calling it a gem because it has such choice sentences as "And, as with every recipe in this book, they have been carefully tested and have been set down in a form of measurement and direction that will be familiar to the American housewives and hostesses for whom this book is intended" (p. vi).  Oh 1950s, may your views on the home go the way of the Dodo.  The ladies did comment that it is a shame neither of my grandparents had written comments into the margins and maybe this is my opportunity to pull my own version of a Julie and Julia.

Truth be told, considering the fact that we found this cookbook in the bedroom not the kitchen, its rather pristine condition, and that generation of my family is straight from Italy makes me think possessing this book was actually a joke.  It's in my hands now though, so we are going to embark on a Brianne and Maria Luisa adventure.  This book is going to get the margin comments it deserves and I'll chronicle the exploits here as I have with everything else.  I won't go recipe by recipe, but I'll do my best to make all of them... there are a couple of recipes that use eel and I have no idea if I'll be able to find eel around here, but we'll see.  I'll also break it up with non Italian Cookbook recipes.  This may sound blasphemous, but even Italy will get old after awhile.  So buckle up my people, things are about to get interesting!


Adventure number one from The Italian Cookbook is Loin of Pork in Red Wine, Maiale al Vino Rosso.  After my initial read-through of the recipe, I have to say that this is not a book for beginners, contrary to what a few Amazon reviewers said.  [I did my due diligence on both this book and Maria Luisa and there really isn't much to say on either subject.  There are still a copy or two of either the first or second printings of this book, but they are way overpriced.  Maria Luisa is allegedly a member of a family that, at least at the time, was quite well connected both socially and politically.  She moved to the United States after World War II with her husband, an American soldier, she met during the war.  Internet searches will only produce results that are based on this one cookbook and one very random college blog post written by a grandchild discussing her.  None of this put me off from questioning her book's subtitle claiming she is an "Italian expert".  I may be an American, but I'm not about to move to another country and claim to be an expert on burgers and apple pie.  But I digress and you all can judge for yourselves.]

So, before my tangent we were discussing how not basic this cookbook is.  Maria Luisa reduced the cooking instructions to such a bare bones level, if you do not already know your way around the kitchen you might easily get lost.  In this recipe in particular she lists "1 clove garlic" as an ingredient and then instructs you to rub it on the pork loin.  Honestly, I have visions of 1950s housewives rubbing down a pork loin with a whole garlic clove then wondering what sort of voodoo flavor infusion is supposed to be occurring.  I think it's time we just straight to the recipe and I'll air my grievances as we go along.

Loin of Pork in Red Wine
Maiale al Vino Rosso

Ingredients:

5 lbs. pork loin
2 cloves garlic - minced
1 c. red wine (full bodied, Maria Luisa suggested Barolo)
1/2 c. tomato pasted diluted in 1 c. water
Salt
Pepper

Directions:

Mince garlic onto the meat and rub in along with the salt and pepper.  Heat up a medium sauté pan over medium high heat.  Make sure it's heated before putting in the meat.  You are going to brown the pork in its own fat therefore you want to hear it sizzle as soon as it hits the pan.  Brown for about 3 minutes on each side.


 Reduce heat, add wine, cover, and simmer until the wine has evaporated - approximately 15 minutes.  You should notice a distinct change in smell; the hot wine scent at the start will have gone away.  Turn at least once during this time so that the meat is cooking evenly.


In case you were curious about what wine I chose, I went with a Toscana from Monte Antico.  It's a blend of Sangiovese, Cabernet Sauvignon, and Merlot from various Tuscan vineyards.

Add the diluted tomato paste and simmer pork for another hour, turning occasionally.  Before taking the meat off the stove, be sure to check its temperature with a meat thermometer.  You'll want it to be between 145F and 155F.


Now, at this point Maria Luisa says you can serve the pork with or without the sauce and that the sauce will be a treat when served with pasta.  No, just no.  The sauce is fine being served with the pork, but I do not think it's necessary and frankly, adds nothing to the enjoyment of the meal.  As for "being a treat," absolutely not.  The sauce, as a standalone item, tastes like you boiled a pork chop in tomato soup.  Why you would then wish to add that to your spaghetti is beyond me.  In my humble opinion [which, as we have all realized by now, is anything but humble] you do not need the tomato paste at all.  Add a little thyme and rosemary to the garlic, salt, and pepper rub and forgo the tomato paste all together.  If you are worried about the amount of liquid in the pan add a little bit of water, maybe some vegetable stock, or if you happen to be me, more wine.  The meat will come out beautifully and the gravy will be better for it.


The being said, I stuck to the cookbooks original recipe and am still quite pleased with the result.  The pork is very tender and juicy.  It was also a good meal to cook when temperatures are still on the high side since cooking on the stovetop does not usually spike the temperatures in the apartment the way roasting something in the oven will.

So, that is one recipe down and only 419 more to go!