Sunday, April 24, 2016

White Bean Hash with Eggs

Breakfast is not a very sexy meal.  It's functional.  We wake up and eat eggs or oatmeal.  Sometimes it's cereal or a little fruit and yogurt.  None of these are the most inspiring dishes.  Though, I will give oatmeal and eggs some credit.  They can get pretty fancy.  Ever baked an egg inside an avocado?  Fancy.  But, in general, we eat breakfast to get our day started right and we go for as much bang for as little effort as possible. 

For the few times we might want a little more effort put into our breakfast, but not necessarily wanting to do it ourselves, there is the diner.  I love going to diners for breakfast.  I want pancakes. I want oversized omelets with a ton of ingredients.  I want eggs benedict over an English muffin. I want home fries. I want corned beef hash.  Hmmm.  I seem to want a lot of things, but everything always tastes so good at the diner!

The hash thing is something I've only recently come around to.  The idea of hash - random things thrown together - didn't really appeal to me.  Which, honestly, is pretty strange.  I have never shied away from weird things all thrown together in one pot.  However, I have always been in control of the weird choices, maybe that was the difference.  I need to be the arbiter of weird, not some anonymous diner chef.

So here we are.  This is my offering to the breakfast gods - a very unsexy and a little weird, kitchen and pantry throw together hash.

White Bean Hash with Eggs
 
Ingredients:
 
1 onion  - chopped
2 medium carrots - chopped
1 tomatoes - diced
1 can cannellini beans - rinsed and drained
Eggs - fried

Directions:

Heat some oil in a large skillet and cook onions until they are soft, about 7 minutes.  Add the carrots and cook another 7 minutes.


Add the diced tomatoes and cover.  Cook for about 10 minutes.  You want the tomatoes to soften up and almost create a sauce.


Add the cannellini beans, cover, and cook for an additional 10 minutes.  Add salt and pepper to taste.  Now come the eggs.
 
 
I decided to cook the eggs with the hash still in the skillet.  If you wanted, you could transfer the hash to a bowl and then cook your eggs.  This hash is enough for 4 servings.
 
 
See...not sexy.  But... it made for a great weekend breakfast.  The combination of the beans and the eggs made this dish quite filling. It was a nice break from my typical fruit and oatmeal.


Sunday, April 17, 2016

Salmon Rolls

Of all my favorite ethnic foods, sushi is my go-to.  I have no qualms with grabbing a roll at the grocery store.  If I want to celebrate a successful day at work, at the sushi bar I sit.  When anyone in my immediate family is having a birthday, the local sushi restaurant is our go-to establishment.

Given all of these sushi-centric eating decisions, it's a little sad that I have not attempted to make sushi at home.  This sadness is only amplified by the fact that I own a sushi rolling mat and a special spoon for tossing the sushi rice.  That's right...I own a sushi rice spoon.  Now I really feel like the big girl on campus.

The mat and spoon were actually a gift...well, sort of a gift.  It was more like a "I'm cleaning out my cabinets and you seemed liked someone who would want this" kind of situation.  Which is exactly how it went down.  I was in grad school, in another life, and one of my classmates was packing up for a move.  He realized he needed to make some serious decisions about what he kept and what he tossed and since I'm a serious kitchen gadget hoarder, I benefited greatly from his downsizing.

I decided to use smoked salmon in my first ever sushi rolls.  Maybe one day I'll have a fish guy that I'll trust enough to buy raw fish from and make sushi out of it.  For now, I'll stick with food I'm 97.3% positive will not give me some sort of weird stomach worm.  For my salmon companion, I went with mango in one roll and avocado in the other.  In my opinion, these are pairings that will have everyone going back for more rolls.

Salmon Rolls

Ingredients:

1 1/2 c. sushi rice
3 c. water
1/2 c. rice vinegar
1 Tbsp vegetable oil
1/4 c. sugar
1 tsp. salt
8 Nori Toasted Seaweed Sheets
8 oz smoked salmon
8 avocado slices
8 mango slices
Soy sauce for dipping

Directions:

In a medium sauce pan, combine water and rice and bring to a slow boil.  Reduce heat to low, cover, and let simmer for about 20 minutes or until all water is absorbed and rice is completely cooked.

In a medium sauce pan combine the vinegar, oil, sugar, and salt.  Heat on medium and stir until the sugar dissolves.  This should only take a few minutes.

Combine the rice and the liquid in a large bowl.  Mix until the rice is well coated.  Let cool completely before working with it.

Once the rice is cooled, lay out your bamboo rolling mat and place a seaweed sheet in the center.


Carefully create a thin layer of rice on the seaweed.  The seaweed is not overly delicate, but it will rip easily so you do not want to get all Incredible Hulk when spreading out the rice.  You also want to be sure your rice layer is thin.  

Bad layering
You'll know you added too much rice once you've rolled it and you get a lot of rice and tiny bit of filling.

Once you have your rice layer, add your filling along the top edge of the rice.  Roll one had an ounce of smoked salmon and 2 slices of avocado.

Good layering
Roll two had salmon and mango.


Using the mat, roll up your sushi.


You may need to use your fingers to keep the filling in place as you fold the top edge over.


The seaweed might slip around a bit as you are rolling so apply consistent pressure, as if you were rolling and shaping bread dough.


Even a sushi novice, such as myself, can get a decent roll on the first try.  Repeat the process until you have all of your rolls and then cut and serve.


I really enjoyed both rolls, but I think my favorite was the salmon and mango.  The salty, smoky flavor from the salmon paired amazingly with the sweetness of the mango.  Two rolls made the perfect weekend lunch.  Enjoy!

Sunday, April 10, 2016

Indian Chickpea Samosas

I love Indian food.  My favorite menu item is Thali - that large dish of small plates.  This way I get an amazing meal without having to make a real decision about which food to order.  With Thali, I get it all!  However, making Indian food was something I always found rather daunting.

Indian food has a very distinct flavor pallet that requires a lot of spices you can't always get at your regular grocery store...masala being the biggest one.  Masala can be fudged (to a certain extent) since it is just a mix of other toasted and ground spices.  However, who really wants to go out and buy coriander, turmeric, cumin, cardamom, and ginger and then combine them in just the right combination?  Searching the state for masala is actually the saner decision.

However, I decided it was time to just get over it and try my hand at some Indian food.  And, I was able to find two different types of masala.  Where? BED BATH AND BEYOND! That store continues to amaze me while also being the devil.  If you are able to go into that store and walk out with only the items you originally intended to purchase, you just might be my new idol.  I went in there a couple of months ago for a bath towel, shower curtain, and bath mat.  I left with a bath towel, shower curtain, and bath mat, and a cutting board, cardamom pods, juniper berries, and a tiny jar of clotted cream.  Don't ask.  This is just what happens when I am allowed to shop unsupervised.

So, what did my magic discover of garam masala at Bed Bath & Beyond mean?  It meant I was going to try my hand at samosas. I decided to be a bit non-traditional with the filling and went with a chickpea masala.  I also decided to be a bit healthier and baked them instead of frying.  They tasted fine baked, but the texture and color is very different than if you fried them.  Regardless, they made a great appetizer.

 
Indian Chickpea Samosas
Ingredients:
 
Dough
 
2 c. all purpose flour
4 Tbsp vegetable oil
1/2 c. cold water
1/2 tsp. salt
 
Filling
 
4 cans (15.5 oz each) chickpeas
4 Tbsp vegetable oil
1 lg onion - chopped
2 Tbsp ginger paste
1/4 tsp. garam masala
2 lg tomatoes - diced
3 c. water
2 cardamom pods - toasted and ground
1/4 tsp. turmeric
8 garlic cloves - minced
 
Directions:
 
Dough
 
Mix flour and salt.  Add oil and, using your hands, rub ingredients together to form fine crumbles.  Add water and begin kneading.  Continue kneading and adding water, a couple tablespoons at a time, until you have a firm dough.  Cover with a damp towel and set aside for 30 minutes.
 
Filling
 
Heat oil in a pot on medium high.  Add the onion, garlic, and ginger, cooking until the onion is soft. 
 
 
Stir in the spices, water, tomatoes, and chickpeas.
 
 
Bring water to a boil, then reduce heat to low, cover and simmer until the chickpeas are very soft - about 20 minutes.  Once soft, use a potato masher to mash up the chickpeas a bit then cook another 5 - 10 minutes on medium high, uncovered, to thicken the sauce.
 
Making the samosas
 
Preheat oven to 350F.
 
Lightly knead the dough then divide into 20 equal portions.  Now, 20 makes these very tiny.  I was making them for an event and so I wanted them to be bite sized.  In normal circumstances, you would only want to divide into 8 or 10 equal portions.
 
Roll out each piece, then cut in half.
 
 
Wet the cut edge with water and create a cone.
 

Fill cone and then wet the cone along its circumference and seal.  Because this filling has a fair amount of liquid, I used a slotted spoon.


Alright, so if you didn't realize, the dough in the last two photos does not look like the dough in the first photo.  The original pictures did not come out well and since I had a ton of chickpea masala leftover I made more.  Round two however was made with store bought pizza dough.  Yea, yea, yea, I was feeling lazy.  But, now you get the idea what these babies should look like.
 
After you've sealed the pockets, place onto a baking sheet.  Brush them lightly with oil.
 
 
Place in preheated oven and bake for 30 minutes, or until lightly golden.
 
 
I was quite happy with these, especially attempting a type of food I do not ever make.  The dough was on the softer side.  If you want there to be a bit more crunch, but still not fried, I would turn the heat up on the oven.

Sunday, April 3, 2016

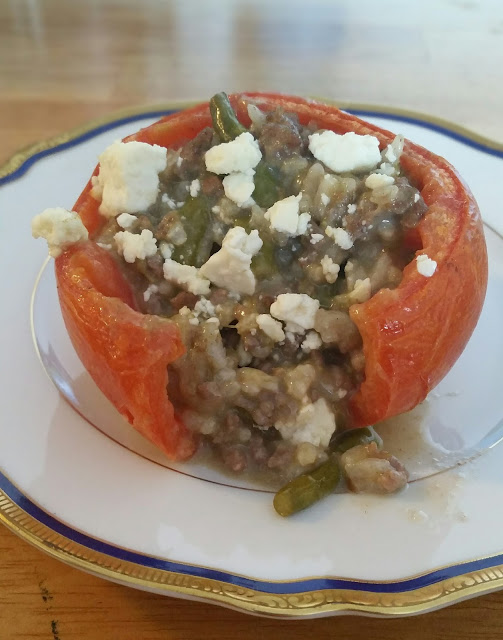
Beef Risotto Stuffed Tomatoes

If you read last week's post, you know I began a quest to make recipes involving each state's food.  We had pecan and blackberries for Alabama and today we have tomatoes and rice for Arkansas.

Tomatoes and rice, tomatoes and rice...really? I'm not sure what I think when I think about Arkansas, but I doubt tomatoes and rice would have ever made the list.  Apparently I need to become better educated on agriculture in the South.

Anyway...when I thought about these two ingredients, it didn't take long for the word "stuffed" to get thrown into the mix.  I was imagining something along the lines of a stuffed pepper, just subbing tomatoes for peppers.  Then I remembered that I had arborio rice in the pantry.  Then I thought about the ridiculous amount of ground beef I had in the refrigerator from the grocery store's stock up sale and that pretty much sold me on the latest recipe.

I realize it does sound completely random...tomatoes stuffed with beef risotto.  Even the beef risotto sounds weird.  I promise you, once the asparagus and goat cheese get added all is right with this recipe.

Beef Risotto Stuffed Tomatoes

Ingredients:

8 lg tomatoes
Salt & Pepper
2 Tbsp butter
2 Tbsp vegetable oil
1 lb asparagus - cut into 1 inch long pieces
1 shallot - diced
1 lb lean ground beef
1 c. uncooked arborio rice
1/2 c. white wine
4 c. beef broth
4 oz. creamy goat cheese
2 oz. crumbled goat cheese

Directions:

Cut the tops off the tomatoes and remove the center.  


Sprinkle the inside with salt and pepper then place upside down on a baking sheet. Let them rest in the refrigerator while you prepare the risotto.

In a large pot, over medium high heat, melt butter and add the vegetable oil.  Add the cut asparagus and cover.  Cook for 5 minutes.  Add the diced shallots and cook until tender, about 3 to 5 minutes.  

Add the ground beef and cook until it is no longer pink. Add arborio rice and mix well.  


Add the white wine and cook until it has evaporated completely.  Begin adding broth, a 1/2 cup at a time, adding the next 1/2 cup once the previous one is completely absorbed/evaporated.  I suggest start taste testing at 3 cups of broth, you want the rice to be fully cooked but firm.  Once the desired consistency has been reached, remove from heat and add the creamy goat cheese.  Mix until fully incorporated then set aside.

Set oven to broil and remove tomatoes from the refrigerator.  Tomatoes should be drained of their excess liquid by now.  Clean off the baking sheet and put the tomatoes back on it, right side up.

Once the oven is heated, broil tomatoes for about 7 minutes. Skin should be just beginning to brown and blister.


Once the tomatoes are done, remove from oven, and reduce heat to 350F.  Fill the tomatoes with the risotto and top with the crumbled goat cheese.


Bake in oven for 15 minutes.


Mmmmmm, these were tasty.  The goat cheese gave a nice tang to the savory nature of this dish.  Having the meat prepared with arborio rice made it a very hearty dish.  Even the largest of the tomatoes could only hold about 1/4 cup of filling, so two of them together made for a great lunch.